Showing posts with label miniatures. Show all posts

Saturday, January 18, 2020

Snowed in: work process in (lots of) pictures


Hi everyone!
It's been ages again, I know... I will try to get this blogging thing together this year (go 2020!), I just never seem to find the time. Anyways, those of you that follow me on Instagram or Facebook have already seen the making of this little snowed in house, but I thought it would be nice to collect all the photos in one place, so here we are ^^

Here you can see the skeleton base of the house. I use Tim Holtz's village dies and mix and match them to create the design I want. The shape of this house was actually inspired by a house I saw on Doc Martin, that's where I got the idea to place the door on the side addition. It took some creative adjustments of the dies, but since I managed in the end ;)
The next step is a loooot of cutting. And I mean A LOT. You can see the walls, window frames and (about a ton of) shingles. After cutting the basic shapes I modify them to fit with what I have in mind. I try to match the colors of the different elements with the planned color scheme, it helps giving a smoother, more natural look in the end (if I don't have a matching colored paper I use white and paint it, but because paints often react with the mediums I use and change it's safer to start with color paper). Even though my miniatures don't aim at perfect realism, I feel that these little touches make a big difference and give the houses their unique character.
Then I texture the walls. There are about a million ways to do it, depending on the look you're after. In this case, I wanted stone walls that has an old-fashioned feel to them, but (unlike my haunted houses) without being creepy (or at least not obviously so ;p)
I used one of Tim Holtz's stencils, I think it's meant more for paved roads, but the uneven shapes are great for old stone walls. There's a variety of pastes and paints you could use, here I went with Ranger's texture paste because it's consistency (and drying time) allows some play and creating the gritty\rocky texture, plus it takes paints perfectly - as you can see in the photos below :)
Because the walls were covered with stone texture it's pretty easy to get realistic results. I went with greys in this one, adding some greenish tints for a mossy effect. It's always easier to paint flat surfaces, so I do most of the coloring before adhering the panels and just add some final touches afterwards. Before adhering the painted walls to the base I added vellum to the windows so it would be sandwiched between the two layers that make up the walls. I also added the door, which was made from woodgrain paper for texture, and built a tiny frame around it. Finally I adhered the roof base in place.
Next are the shingles! I used Tim Holtz's distress black paper because it has some (lovely) texture and a kraft paper core so when you sand it you get a pretty realistic look for the shingles. To be honest, I usually put a lot more into the texture and coloring of the shingles, but in this case I knew they would be mostly covered with snow so only did the minimum.
For the windows, decided to add glaze on top of the vellum. I usually use vellum because it's masks the candle and diffuses the light beautifully, but I wanted the shine of glass and decided to try glaze. I really like the results here, it's not completely even which fits with wet/frosted windows. I'm not sure it would work with other projects, but here it does. 
I then tinted the frames a bit to bring out the texture of the paper and added some glazing so it would look more like a lacquered frame.
Next is making a base for the little house.
I use two layers, the bottom is wood, so I don't need to worry about warping when I add paints and whatnots. The upper layer is thick grayboard, so I can cut out the shape of the house with a craft knife. This creates a perfect place for the house to nestle in and keeps the whole structure stable even though the house and base are not adhered. 
I painted the base white and voila! The basic house is ready, now the real fun begins with the details :)
The first thing I did was to cover the house and little yard with snow. I used Tim Holtz's Distress Grit-paste and sprinkled it with Distress clear Rock Candy Glitter. I'm not a fan of glitter, but I saw a lot of AMAZING examples of snow effect using these two products over the holiday season so I had to try and I have to admit - I squealed a little, but I mean just LOOK at this roof! Can you blame me?
I sort of forgot to take process photos from this stage, just got sucked into it... You can see the results, tough, and I'll just go through what I did ^^
In building the snow in the yard I created an entrance way and then painted the paving. The little snowman was made from air-dry clay, I used the end of a toothpick for the nose and teeny-tiny branches for his arms. When the clay was set it was brushed with grit-paste and then a bit of glue and rock candy glitter. I added very (very) thin strips of grayboard under the window frames and sprinkled them with snow. 
This is the original front view, but it felt like something was missing. I got some great ideas from followers on FB, and in the end added the sledge. I used the same woodgrain paper I used for the door and some silver metallic paper for the runners. It's seriously tiny, and I had to use tweezers in making it because my fingers were just too big! After placing the sledge in a little pile of snow (=some more grit paste + glitter) I added the "rope" as the finishing touch.
The lantern at the door was made with a flower-center die I cut from grey paper, rounded and then built the lamp with clear Nuvo drops + a drip of their glow in the dark yellow drops. The yellow does glow in the dark, but it's such a small amount it's hard to see... However, like most glow in the dark products, it has this luminescent property even in the light that definitely works for a lamp.
On the side and back I added trellis using a fabric net I brushed with Distress Collage Medium Vintage. The tint in the medium gave the net a light brown shade that is perfect for a wooden trellis and also hardened it and made it easier to shape. I threaded some green and brown threads through the net for vines, or what's left of the - it is snowing after all! Finally I added a cat at the back window, just because :)
Here are some more shots of the house from different angles, so you can see the overall view.
That was a long one! I hope you found some part of it useful. I think I covered everything, but if you have any questions do feel free :) 

Till next time! xx

Friday, December 08, 2017

Interlude: Tiny Books and Were to Find Them (around your neck)


I had soooo many plans, I even started up a couple of projects, but the pre-holiday-season is definitely one of those ‘expect the unexpected’ times of year… In the last couple of weeks, instead of finishing some project or other, I found myself spending every free moment making tiny books. There is no complaint in that statement, I love making these tiny treasures and I LOVE when they make others smile, so I thought I’d share some of them here too.
As a lifelong (and proud) nerd and lover of stories, it’s no surprise books have always been a great love of mine. I love gigantic old books, but let’s face it – who doesn’t love a tiny book? And I mean tiny, the books I make are 2-2.5cm tall, and I’m always surprised and how much detail they have.
 

Once I had the books though, I started thinking what to do with them and jewellery seemed like a good idea. I started with necklaces and continued to earrings.

 Shabby Book pendant necklace
 Shabby Book earrings
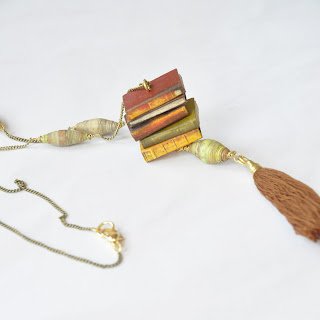
Then I thought - why settle for one book? I definitely don't with reading books! And so the stacked-book necklace was born. 

 Stacked Books Pendant and Tassel Necklace
Lately I started thinking of making more specialized designs and started with my new grimoires, I must admit - I adore them 🖤

 Tiny Grimoire Book Pendant Necklace
It’s not exactly hard to make tiny books, but it does take time and a LOT of patience, and they don’t always come out right – a scratch, a paint stain… I make vintage style books (old books are the best!), but there’s a limit to what I can pass as shabby. In every batch there’s a couple of books that don’t pass my ‘pendant quality’ test and I ended up with a small pile of sad books with no purpose – clearly that could not stand! So I found them new purposes. You may have noticed a few of them in “The Witch’s Son” Tale-ing Fragment. I also use them when I make witch’s cabinets. A scratch on the cover of the book was covered nicely by a grinning skull. 

Miniature Witch Cabinet

For the Wiccan cabinet I used a couple of damaged books, but also made a spell book that can open – way too much fun there

 Miniature Wiccan Witch Cabinet
I hope you enjoyed this tiny-book interlude (with lots of photos), did you like how I used the books? What would you make with tiny books? 

I’ll be back soon (hopefully) with a new project!