Tuesday, April 21, 2020

Tale-ing Fragments #7: Nature's grace & beauty


"With shining eyes she noted all of nature's beauty and grace."
  
Like my former post, this project brings together the results of trying out different materials and techniques. The first part I made is actually the small frame in the center. It's a Baseboard Lace Frame I altered with Distress Crayons and Glazes, it's pretty amazing to think it started in pale cream-color. I particularly like the silver shimmer created with Brushed Pewter crayon.
I usually alter elements like frames to fit whatever it is I want to frame, so it was a little strange for me to do it the other way around, but I went through my stash and found this lovely lady. Then I looked through my recent experiments for a background and found a bright green one with botanical images and the story was set in my mind. Does she not look like she's listening? Observing? 
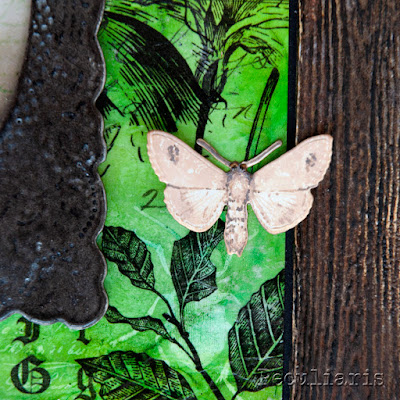
I had to remake the background because the piece I had was too small, which gave me the opportunity to play with the imagery. I started with Yupo synthetic paper and created a mix of greens with alcohol inks. Then I used Tim Holtz's Entomology stamp set and Alcohol Lift-Ink pad to create ghost images of insects and writing. The lifted handwrite was stamped on the photo around our studious lady. When I was happy with the alcohol ink background, I added Collage Paper over it with the technique Tim has shared in a demo last week using Resist Spray. The spray creates a shiny finish that deepens the colors and, because the lifting creates white images, the black images on adds depth and interest.
For some extra spots of color I stamped, colored and cut some of the Entomology images. The cicada was especially fun because I could place it next to the ghostly lifted image! Since I didn't want to block too much of the background (it has big wingspan!) I stamped the image on acetate as well and added the clear wings to the body, I really like how dimensional it all becomes.
I chose to add a moth instead of a more colorful butterfly because it's delicate coloring fit better with the colors I used to tint the photo and the text strips.
The final part was making the frame. It wasn't planned, at all, but I felt a frame was needed and could not find one in the right size, so I decided to try and make one! I used a similar technique to the one I shared in my last Tale-ing Fragments post, but with Woodgrain Cardstock and I really love the results! I'll definitely make more frames from no on, it's just so convenient!

I'm entering this project to the Simon Says Stamp Monday Challenge that has a 'create a scene' theme. I figure it fits since it is telling a story, albeit a fragmented one ;)
SSS Monday Challenge Blog
Hope you enjoy this little walk-through, I'd love to hear what you think and as always feel free to ask anything!

Keep safe and keep your spirit up,
xx
Naama


Sunday, April 12, 2020

Mechanical Blooms

"Bloom where you are Planted"

I think that the idea behind this saying is very fitting for our current time, the covid-19 situation has placed us all in uncharted territory on some level, be it working from home, not going outside or meeting the people you love. It's all so confusing, but the best we can do is keep positive and try to make the best with our time.
Like many artists and crafters I found that I have more time to experiment, play around with materials without really thinking or aiming for a specific outcome. The project I'm sharing today came about as I was experimenting with different techniques, I'll try to break it down a bit.

The background brick wall texture was made using a variation of the Distress Glazes & Crayons technique Tim Holtz shared in his (now becoming regular - yay!) Saturday demo about two weeks ago that focused on Distress Crayons. I used it over Texture Paste applied through a brick stencil and I love the results! (I was asked to make a tutorial for this brick wall variation, you can find the video in my Facebook page here). I cut out the brick texture to the size I wanted and adhered it to my background, in the final stages I added a bit of moss 💚 

The flowers were actually inspired by a stamp image of a flower made from metal plates. If you follow me on social media you know I've been making paper flowers for a while (usually tiny ones), I thought why not try make a metal-paper flower? I used embossing folders for the petals and electric wire for the stem of two flowers, the third I just nailed down 😂


I'm still working on this idea, but for now - definitely like these whimsical blooms!

I wanted to add a message, but when I put down a sentiment strip it just didn't fit, it felt too detached from the quirk-celebration going on, so I decided to play with it :)
I cut the sentiment in gold letters and then cut a whole lot more letters in black and scattered the letters of the message between random black letters. The message is still readable, but you might need a moment to piece it together, so it becomes more a part of the background than a focal point. The black letters are barely visible at first, but it's surprising just how much these kind of details add to the final piece.


I'm not sure I covered everything, it's a small piece (20x15cm) but there's a LOT going on! If  missed something - feel free to ask! ^^

I'm entering this project in two challenge blogs: the Simon Says Stamp Monday Challenge Blog that has a texture theme this week, and the Sandee & Amelie Steampunk Challenge Blog that extended their March challenge to give us all some more time to play :)
SASPC Blog


SSS Monday Challenge Blog

Hope you enjoyed this project, keep safe and keep that smile on your face :)
xx
Naama